第1步:注册OpenAI并获取API密钥
第2步:创建聊天界面
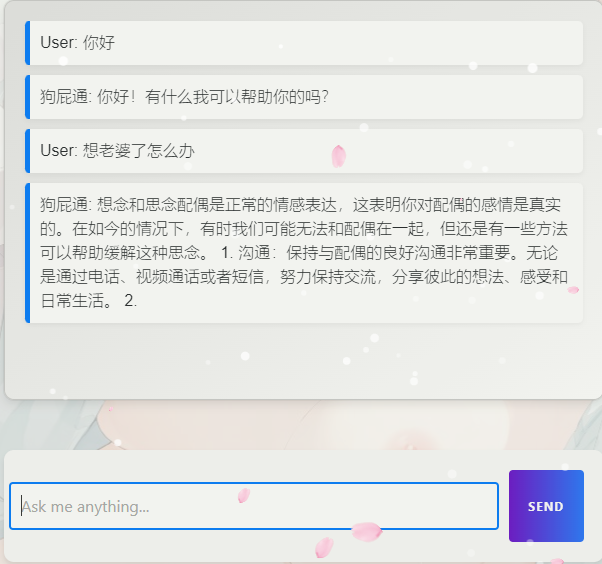
插入HTML代码。这通常在你主题的某个.html或.php文件中:
<div id="chat-output"></div>

<!-- 加载指示器的容器 -->
<div id="loading-indicator" style="display: none; text-align: center; margin-top: 20px;">加载中...</div>

<form id="chat-form">
    <input type="text" id="user-input" placeholder="Ask me anything..." autocomplete="off">
    <button type="submit">Send</button>
</form>
第3步:编写AJAX代码
确保这段代码在加载了jQuery库之后(如果你的主题使用了jQuery):
<script>
// 当提交chat-form表单时,触发以下功能
document.getElementById('chat-form').onsubmit = function(event) {
    // 防止表单的默认提交行为
    event.preventDefault();

    // 获取用户的输入值
    var userInput = document.getElementById('user-input').value;
    // 清空输入框,为下一条消息做准备
    document.getElementById('user-input').value = '';

    // 显示加载指示器,向用户反馈正在处理中
    document.getElementById('loading-indicator').style.display = 'block';

    // 发送请求到服务器的PHP脚本处理用户输入
    fetch("path/to/your/script.php", {
        method: 'POST', // 使用POST方法
        headers: {
            "Content-Type": "application/json" // 设置内容类型为JSON
        },
        body: JSON.stringify({ // 将用户输入转换为JSON格式
            userInput: userInput
        })
    })
    .then(response => {
        // 检查响应是否成功
        if (!response.ok) {
            // 如果不成功,抛出错误
            throw new Error('Network response was not ok');
        }
        // 将响应数据转换为JSON
        return response.json();
    })
    .then(data => {
        // 隐藏加载指示器,因为数据已经接收
        document.getElementById('loading-indicator').style.display = 'none';

        // 打印接收到的数据到控制台(调试用)
        console.log('Received data:', data);
        // 获取聊天输出元素
        var chatOutput = document.getElementById('chat-output');
        // 向聊天输出中添加用户的消息
        chatOutput.innerHTML += '<div>User: ' + userInput + '</div>';
        // 向聊天输出中添加服务器响应的消息
        chatOutput.innerHTML += '<div>狗屁通: ' + data.choices[0].message.content + '</div>';
    })
    .catch(error => {
        // 如果在请求或处理中出现错误,将错误打印到控制台
        console.error('Error:', error);
        // 将错误信息显示在聊天输出中
        var chatOutput = document.getElementById('chat-output');
        chatOutput.innerHTML += '<div>Error: 无法连接到服务器。请稍后再试。</div>';
        // 隐藏加载指示器
        document.getElementById('loading-indicator').style.display = 'none';
    });
};
</script>
第4步:创建PHP文件、
创建一个新的PHP文件,比如script.php,然后添加以下内容:
<?php
// script.php

// 从前端获取数据
$data = json_decode(file_get_contents('php://input'), true);
$userInput = $data['userInput'];

// 设置OpenAI API的请求参数
$postData = json_encode(array(
    "model" => "gpt-3.5-turbo",
    "messages" => array(array("role" => "user", "content" => $userInput)),
    "max_tokens" => 150
));

// 初始化cURL会话
$ch = curl_init('https://api.openai.com/v1/chat/completions');
curl_setopt($ch, CURLOPT_RETURNTRANSFER, true);
curl_setopt($ch, CURLOPT_HTTPHEADER, array(
    'Content-Type: application/json',
    'Authorization: Bearer ' . 'YOUR_OPENAI_API_KEY' // 将密钥放在服务器端脚本中
));
curl_setopt($ch, CURLOPT_POST, true);
curl_setopt($ch, CURLOPT_POSTFIELDS, $postData);

// 执行cURL请求,获取响应,并关闭会话
$response = curl_exec($ch);
curl_close($ch);

// 将OpenAI的响应发送回前端
echo $response;
在这个PHP脚本中,您的API密钥被保存在服务器端,不会被公开暴露给前端用户。应当确保你的服务器安全,使用环境变量或其他方法来存储密钥,避免将其硬编码在脚本中。
确保用你从OpenAI获得的API密钥替换YOUR_OPENAI_API_KEY。
第5步:创建样式
/* Chat form styling */
#chat-form {
max-width: 600px;
margin: 50px auto;
background: #f9f9f9;
border-radius: 10px;
box-shadow: 0 4px 6px rgba(0, 0, 0, 0.1);
padding: 20px;
display: flex;
gap: 10px;
}

/* Style for the input field */
#user-input {
flex-grow: 1;
padding: 10px;
border: 2px solid #ddd;
border-radius: 4px;
font-size: 16px;
color: #333;
}

/* Removes the default form focus outline */
#user-input:focus {
outline: none;
border-color: #007bff;
}

/* Style for the send button */
button[type="submit"] {
padding: 10px 20px;
background-image: linear-gradient(to right, #6a11cb 0%, #2575fc 100%);
border: none;
border-radius: 4px;
color: white;
text-transform: uppercase;
letter-spacing: 1px;
font-weight: bold;
cursor: pointer;
transition: background 0.3s ease;
}

button[type="submit"]:hover {
background-image: linear-gradient(to right, #2575fc 0%, #6a11cb 100%);
}

/* Chat output styling with 3D effect */
#chat-output {
max-width: 600px;
margin: 40px auto 20px; /* add spacing above and below the chat */
padding: 20px;
background: #f0f0f0; /* a light grey background for chat output */
border: 1px solid #ccc; /* a solid grey border */
border-radius: 10px; /* rounded corners */
box-shadow: 0 4px 10px rgba(0, 0, 0, 0.1), /* a soft shadow for depth */
            0 0 0 1px rgba(0, 0, 0, 0.05); /* a thin border shadow for a crisp edge */
height: 400px; /* fixed height with scroll */
overflow-y: auto; /* only vertical scroll */
font-family: 'Helvetica Neue', Helvetica, Arial, sans-serif; /* font styling */
position: relative; /* for pseudo-element positioning */
background: linear-gradient(145deg, #e6e6e6, #ffffff); /* subtle 3D gradient */
}

/* Style for each message in chat output */
#chat-output > div {
margin-bottom: 10px; /* spacing between messages */
padding: 10px;
background: #fff; /* white background for messages */
border-radius: 5px; /* slightly rounded corners for messages */
border-left: 5px solid #007bff; /* blue left border for distinction */
font-size: 16px; /* font size for readability */
box-shadow: 0 2px 5px rgba(0, 0, 0, 0.05); /* soft shadow for the messages */
}

/* Add a "page" effect to the bottom of the chat output */
#chat-output:before {
content: '';
position: absolute;
z-index: -1;
bottom: 10px;
right: 10px;
width: 80%;
height: 20px;
background: linear-gradient(to right, rgba(255, 255, 255, 0), rgba(0, 0, 0, 0.05));
border-radius: 50%;
}

/* Scrollbar styling for chat output */
#chat-output::-webkit-scrollbar {
width: 8px; /* scrollbar width */
}

#chat-output::-webkit-scrollbar-track {
background: #f1f1f1; /* track color */
}

#chat-output::-webkit-scrollbar-thumb {
background: #ddd; /* thumb color */
border-radius: 10px; /* rounded corners for the scrollbar thumb */
}

#chat-output::-webkit-scrollbar-thumb:hover {
background: #ccc; /* thumb color on hover */
}

/* Responsive adjustments for smaller screens */
@media (max-width: 640px) {
#chat-output {
    max-width: 100%;
    margin: 20px auto; /* adjust the spacing on smaller screens */
}
}


/* Placeholder color styling */
#user-input::placeholder {
color: #aaa;
}

/* Ensure the form elements align properly */
#chat-form * {
vertical-align: middle;
}

/* Responsive design adjustments */
@media (max-width: 640px) {
#chat-form {
    flex-direction: column;
}

button[type="submit"] {
    width: 100%;
    margin-top: 10px;
}
}
#loading-indicator {
display: block;
text-align: center;
margin: 20px;
font-size: 24px;
}
第6步:测试聊天功能

如果需要响应个更多的token,修改
"max_tokens" => 150;ChatGPT API允许的最大token数量为4096
每1k个token的价格为0.002美元
确保对错误处理进行测试:关闭你的服务器的网络连接或者故意使用一个错误的API密钥来查看错误消息是否如预期显示。
注意事项:如果您的服务器位于中国大陆,且需要访问国外的API服务,会因为网络限制而遇到访问困难
以下是可能解决的方法:
- VPN/代理服务
- 云服务商的全球网络产品
- 中继服务器
- 内容分发网络(CDN)
- HTTP/HTTPS隧道
- Web服务
Assistant API(beta)这个应用程序接口级别的 GPTs,才是 OpenAI 发布会最大的亮点!让你的网站、应用或者是可以联网的任何系统,在 API 级别与 ChatGPT 通过对话互动,OpenAI 开发主管 Romain 的这段演示同样精彩👀
你可以即时按照 GPT 的回答来控制用户界面的表达,用户也能上传格式复杂的数据和文件,GPT 会帮你理解,从而实现数据传输和交互,这种基于大语言模型的 streaming 方式的对话界面,也许正在悄悄颠覆传统的 UI 设计!这是真正意义上的 Copilot,一个可以完全融入你系统的智能副驾!
如今的OpenAI发布会,比当年苹果发布会还要震撼

暂无下一篇
下一篇 OpenCV的学习笔记
违法犯罪举报平台
你好,无法连接到服务器。请稍后再试,这个怎么解决?